Friday, January 24, 2014

Creative Christmas Wrapping

Finally back for another update! This one is something I have been meaning to post since Christmas. (Excuse the picture quality- I had to use my cell phone, my camera was dead)

Penguin, Reindeer, & Polar Bear Presents (Better quality, individual pics below)
 Here is the story: My parents and I decided to give money cards to my teenage nieces and nephew. We also wanted them to have a little something to open and be able to use on Christmas Day. Skittles is a old favorite of theirs, so they each got a bag. While I was wrapping, I thought it would be cooler to make it more interesting, instead of just sticking the Skittles in a box or gift bag. I had seen some pictures on Facebook of how people had wrapped presents to disguise what they were. Most used cardboard to build newly shaped boxes for presents, but I didn't have the materials or that kind of time (I was wrapping these late on Christmas Eve - Procrastinator!!)

I started to try to manipulate the bag itself, to see what would happen. I noticed that I could get a shape kind of like a body, really more like a beanie baby. Rubber bands were the best way to help them keep their shape. Once they were tied up, they were really sturdy. Here is what they looked like at this point:

Step 1: Make the body shape and bind with rubber bands

Next, I needed to add some heads to the bear and reindeer bodies. (The penguin didn't need anything extra, I just shaped his head and neck with the rubber bands.) I made the head forms by balling up scrap wrapping paper and using artist tape to bind it together and attach it to the body.
Step 2: Add head to Reindeer Body
Step 2  Cont.: Add head to Bear Body
The last steps were to wrap the bags with wrapping paper and add in little details. Wrapping was just trial and error until I got them all covered properly. I drew in eyes, noses, and mouths with a sharpie marker. Next, I cut and folded wrapping paper to make the ears and tails on the reindeer and bear, and the wings and beak of the penguin. I cut long strips of wrapping paper for scarves and reins for the reindeer. To make the antlers for the reindeer, I used a scrap wrapping paper tube and cut out the antler shapes. These were nice and sturdy, since this was a heavier paper and the curl of the tube made the antlers curve as well. This was a nice effect. The antlers were taped on. Here are the final pieces!

Penguin
Reindeer
Polar Bear

 The kids really seemed to love them.  They liked them so much they didn't want to unwrap them right away. They did take a stab at guessing what they were, and got it right pretty quick!

Fun wrapping experiment! I may try this again at some point, there is a lot of problem solving involved and it keeps things interesting!


Sunday, September 15, 2013

Photoshop Lesson Update on Art Ed Blog

I just added one of my Photoshop lessons on my Art Ed. blog at http://kellynixonarted.blogspot.com/. 

Bear-Frog Animal Hybrid: Demo Model

This lesson was to make an animal hybrid by using photo-manipulation. It was aimed at Art I students, check it out for more details. 

You may recognize the Bear-Frog image featured for the lesson from my art portfolio pages. I had originally made him as a demo model for this lesson and liked him so much I kept him as an art portfolio piece : ). 

Enjoy!

More artwork and lessons coming soon!

Tuesday, September 3, 2013

Art Education Blog Launched!

I have launched a new blog dedicated to my love of Art Education at http://kellynixonarted.blogspot.com/. I will be adding more content over the next few days as a go through my art lessons, check back soon for more updates! I have also added links to my other websites to the right. Check them out!


Monday, June 3, 2013

Live the Lifestyle Logo Design

Here is a new logo design I made for the Live the Lifestyle: Weight Management program. This logo was a fun one to do. Most of the challenge was in figuring out the best way to transition the colors from green to blue, spacing in general, and other little design elements. I did get to play a bit more with the gradient tool in Adobe Illustrator. For the concept, the client wanted to use a tree design and incorporate measuring tape into the design. She also wanted to make the 'L' from Lifestyle merge with the tree.Color-wise we tried some variations and decided that green and blue best reflected the healthy and calm feel that the client was going for. I am very pleased with how it turned out. Keep your eye out for the logo, it has been on Facebook quite a bit!


Live the Lifestyle Logo Design


**This logo is copyrighted to the client who commissioned it, do not use without permission!**

More Queen City Sports and Social Club Designs

Time for some updates!

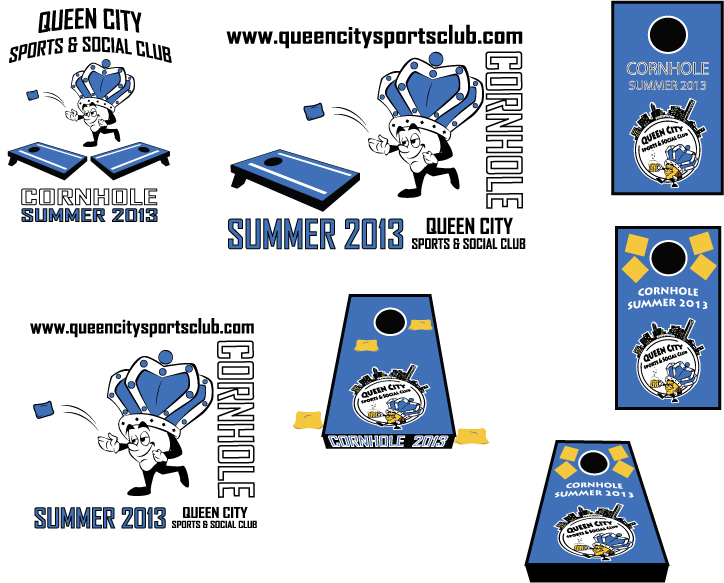
Here are a few new logo designs I have been working on for Queen City Sports and Social Club in Charlotte, NC. These are some different logo design samples intended to be used for Cornhole and Volleyball T-shirts this year. I combined each sport into 1 file each to make them easier to check out. Each image is a possible T-shirt logo, so there are 7 possibilities for Cornhole and 4 for Volleyball.


Cornhole T-shirt Design Samples


Multiple sports allows for multiple logos!  Here are a few designs for the Beach Volleyball T-shirts.


Beach Volleyball T-shirt Design Samples
**As always, all logos are copyrighted to the client who commissioned them, do not use without permission!!**


Friday, December 21, 2012

Logo Design Work

Design work updates:

Here are some of the logo designs I have been working on lately. They were all sketched by hand and later developed in Adobe Illustrator. This program is the best for logo designs since you can re-size the images without them getting blurry.

*All logos are copyrighted to the clients who commissioned them from me, do NOT use them with out permission*


This is a design for Queen City Sports and Social Club in Charlotte, North Carolina. Here I was representing both the city and the activities of the club. This club meets to play team sports like kickball and football, as well as meeting socially to have a drink or two. The logo has a few versions for different sports and uses. The ball that the mascot holds is different for each sport. Fun and challenging logo to work on.
Full Logo in Black and White

Mascot for Queen City Sports and Social Club in Color  
Mascot for Queen City Sports and Social Club- Kicking Version


This next one is a logo design for the company RDM: Preservation and Revitalization. This design is for a local business in Richmond, Virginia that buys and restores various buildings. I really wanted to incorporate negative space into the design and I used it to create the white building in the center of the logo. Notice how the white building is created only with the edges of the other shapes around it. The colors of the logo are a reference to the positive energy of the company bringing buildings back to life and their push to 'go green' in their operations.
RDM logo design


The next logo was made for a local company called Karnes Heating and Air Conditioning which is based out of the Richmond, Virginia area. The concept was to incorporate/combine the client's love of river sunsets, relaxation, and the heating and air theme. This was done with a stylized sunset and water line to illustrate a sunset. The warm and cool colors and wavy breaks in the sun are a nod to heating and air. 

Visit this company on Facebook at: https://www.facebook.com/KarnesHeatingAndAirConditioning
Karnes Heating and Air Conditioning Logo

Here is a logo design for ABNIX: Delivery and Moving. This logo was designed for a local moving company in Richmond, Virginia before its start-up. The 'A' letter behind the business name was designed to look like an angel, to reference the loved one the company was named after.
ABNIX: Delivery and Moving Logo Design


*All logos are copyrighted to the clients who commissioned them from me, do NOT use them with out permission*

That is all for now more updates to come soon. Happy holidays and Happy New Year to everyone!

Wednesday, October 31, 2012

Halloween Pumkin Carvings

Here are my pumpkin carvings for this year. The patterns were found in Pumpkin Masters pumpkin carving books and on various websites like zombiepumpkins.com. I just wanted to challenge myself a little and have some fun. Enjoy!

Pumpkin Totem Pole - Lit
Pumpkin Totem Pole - Unlit

If you are looking for a different way to display your carvings, the pumpkin totem pole is a fun way. These are artificial pumpkins stacked with a dowel rod attached to a base in the center for support. I use leaf garland to cover the spaces between pumpkins and to add some more decoration. The nice part about the artificial pumpkins is that I can reuse them again next year!

Cheshire Cat - with color changing light
I found these great color changing LED lights for pumpkins at the craft store. They add a lot of fun to the carvings!
Cheshire Cat - with color changing light

Scooby-Doo - with color changing light
Scooby probably turned out as one of the best. He was my favorite cartoon character when I was a kid, this is a little nod to him.
Scooby-Doo - with color changing light

Lion - with color changing light
This was originally a tattoo design that I found online at tattooique.com under tribal tattoos. I altered a little to make it suitable for pumpkin carving. Very intricate and challenging!

Lion - with color changing light

Hope you enjoyed them! Happy Halloween!